The Challenge:
Getting our Client's CAD models and big ideas into the HoloLens is like describing a historic building. There are SO many little details that, including them all, might take all day to convey. Displaying a model in the HoloLens works in a very similar way. The current processing power of a HoloLens is similar to that of a mobile phone. If we tried to include every detail, the HoloLens would be overloaded with information and the application would become too complicated to run.
As a 3D Artist/Designer, my job is to make an accurate representation of this very detailed model that is simpler, but still looks good. To create a good 3D model, we take these very high density models and reduce the number of tris (triangles) in the model so they will run in HoloLens and other AR / VR / MR devices.
This is what we mean when we say "mesh simplification".
An Introduction: Key Terms
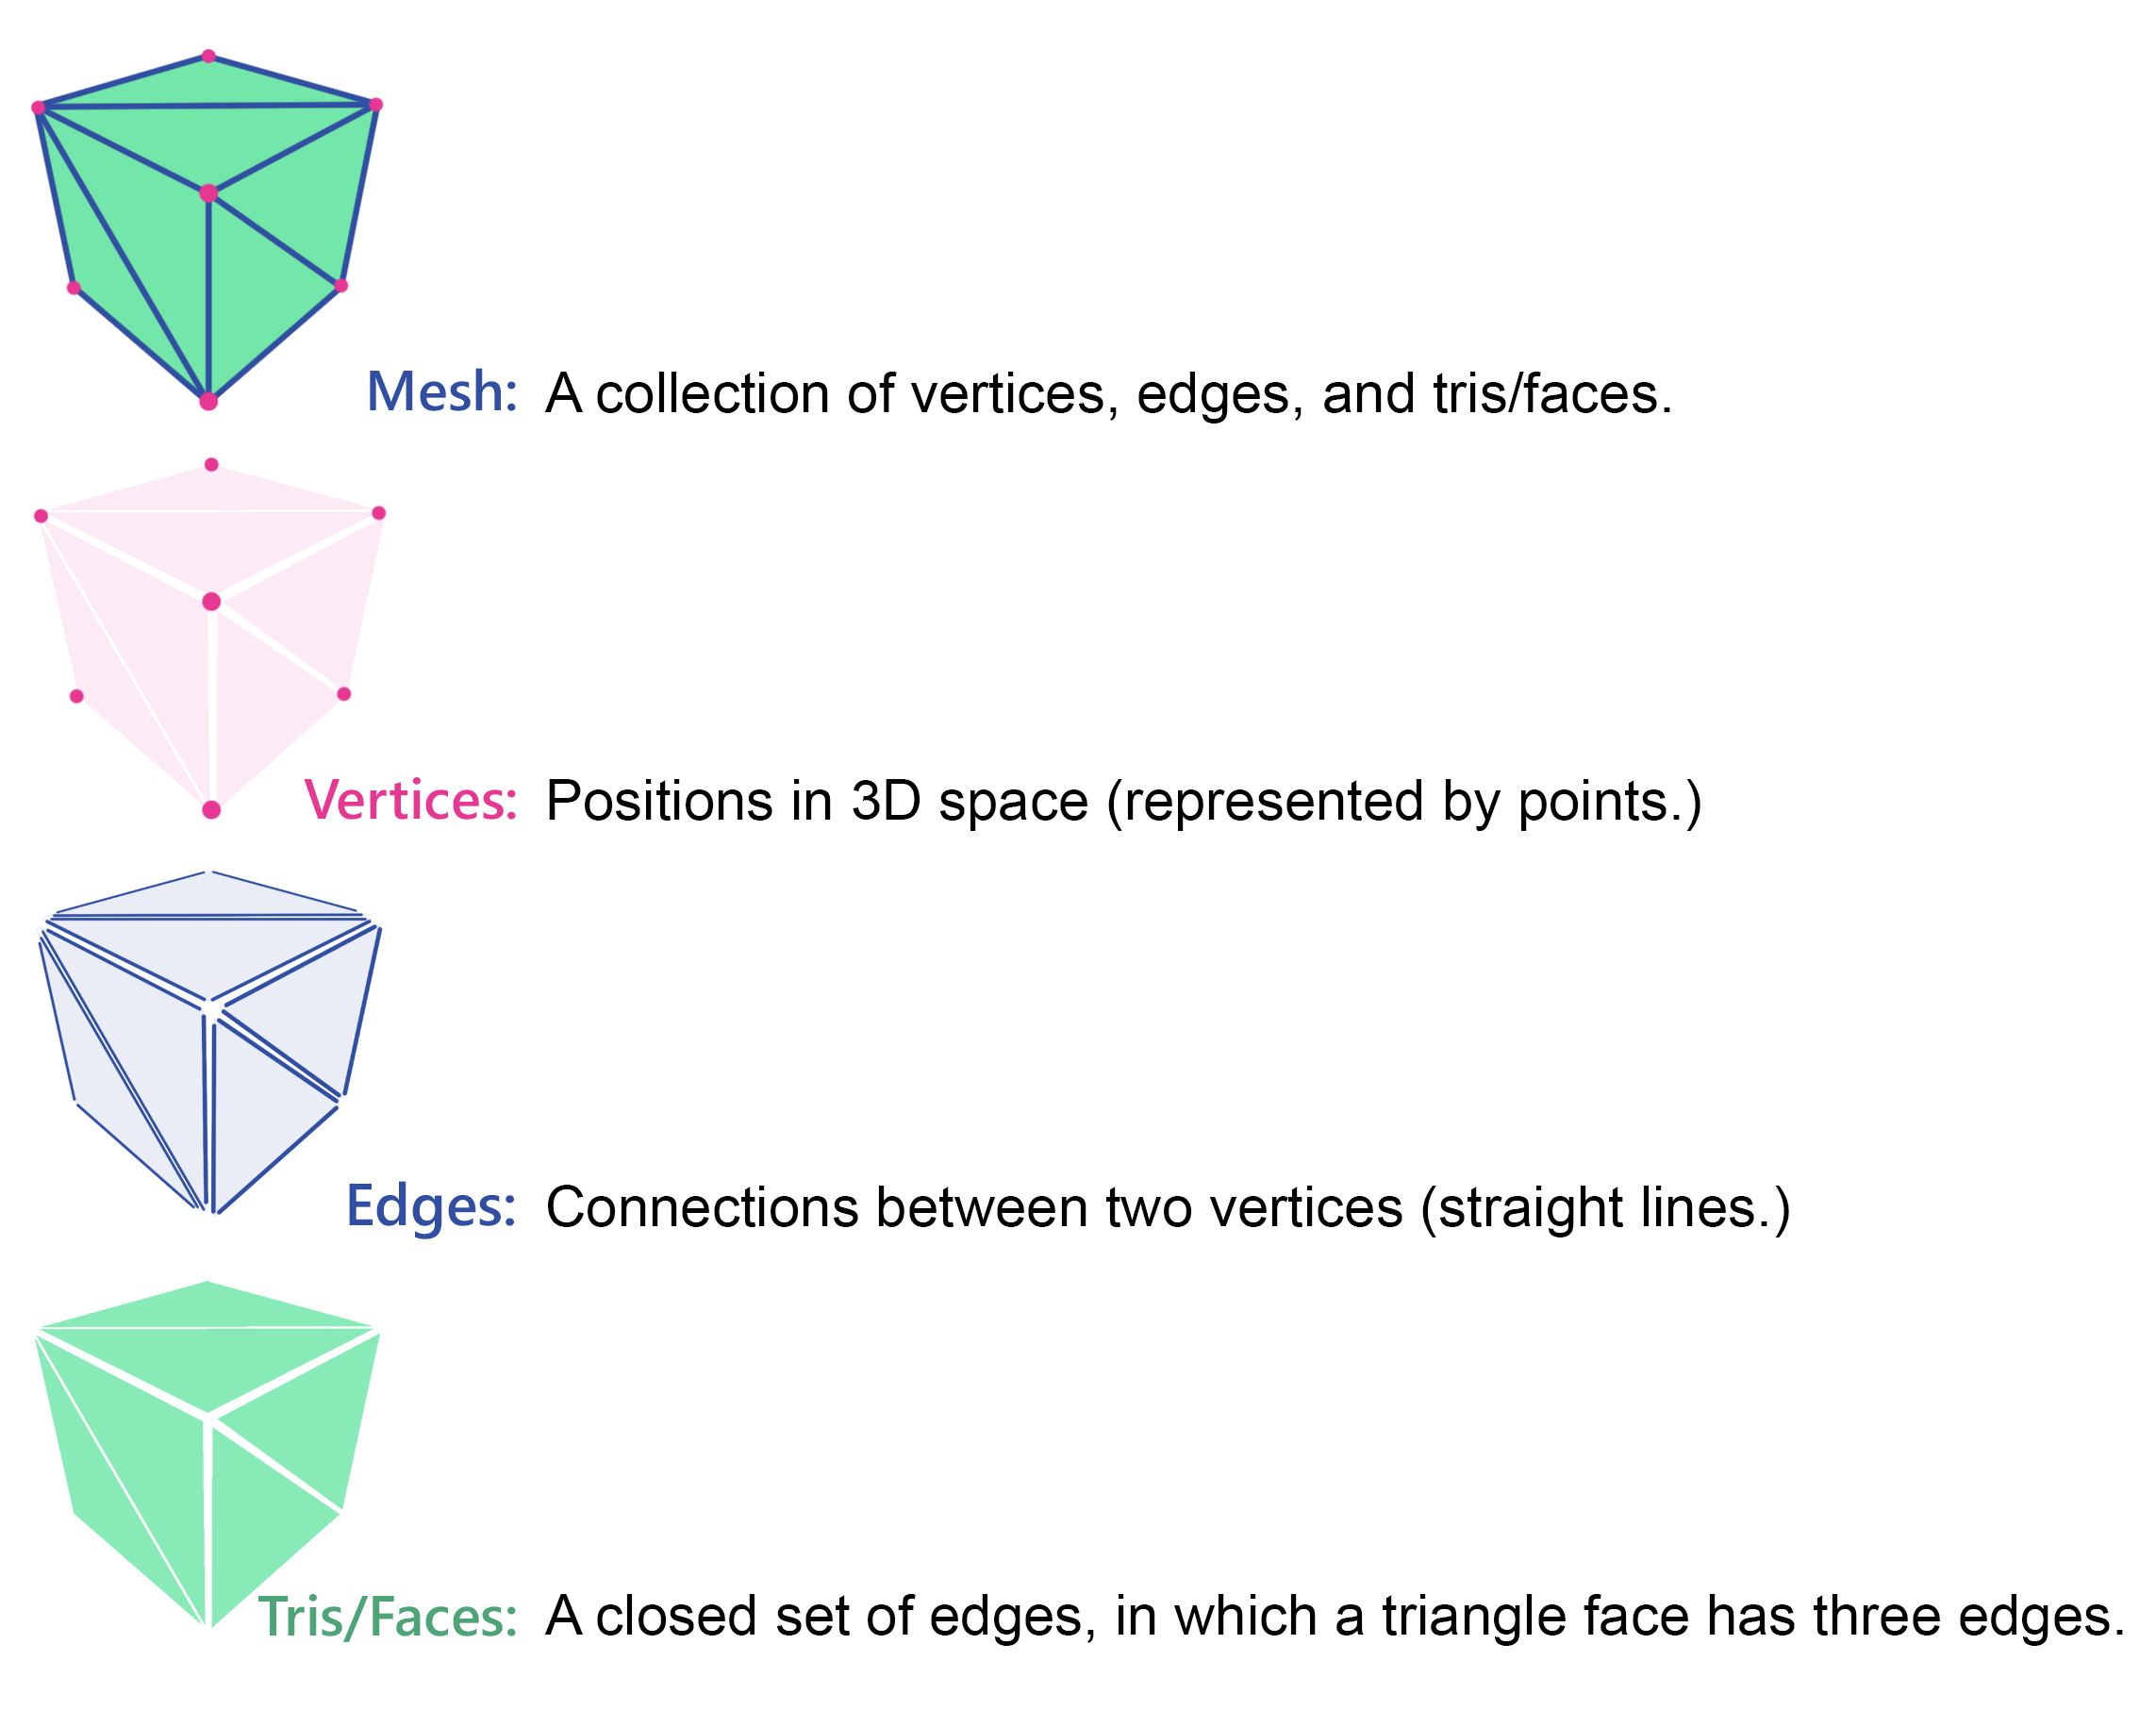
For this post, when I talk about a 3D model or mesh, I'm describing the shape of an object in 3D applications. This mesh is a collection of vertices, edges and tris/faces with the simplest faces consisting of triangles (tris.) Here is a helpful pic:
The Solution: Simple Right?!
The visible world around us (and the meshes we receive) have a massive amount of detail; but the human eye only needs a fraction of this detail to make an intuitive jump into understanding a model or idea.
Because of this, I can approximate these models and ideas using mesh simplification. Consider for example, a circle made of 16 edges and a cylindrical prism with 16 edges defining its top.
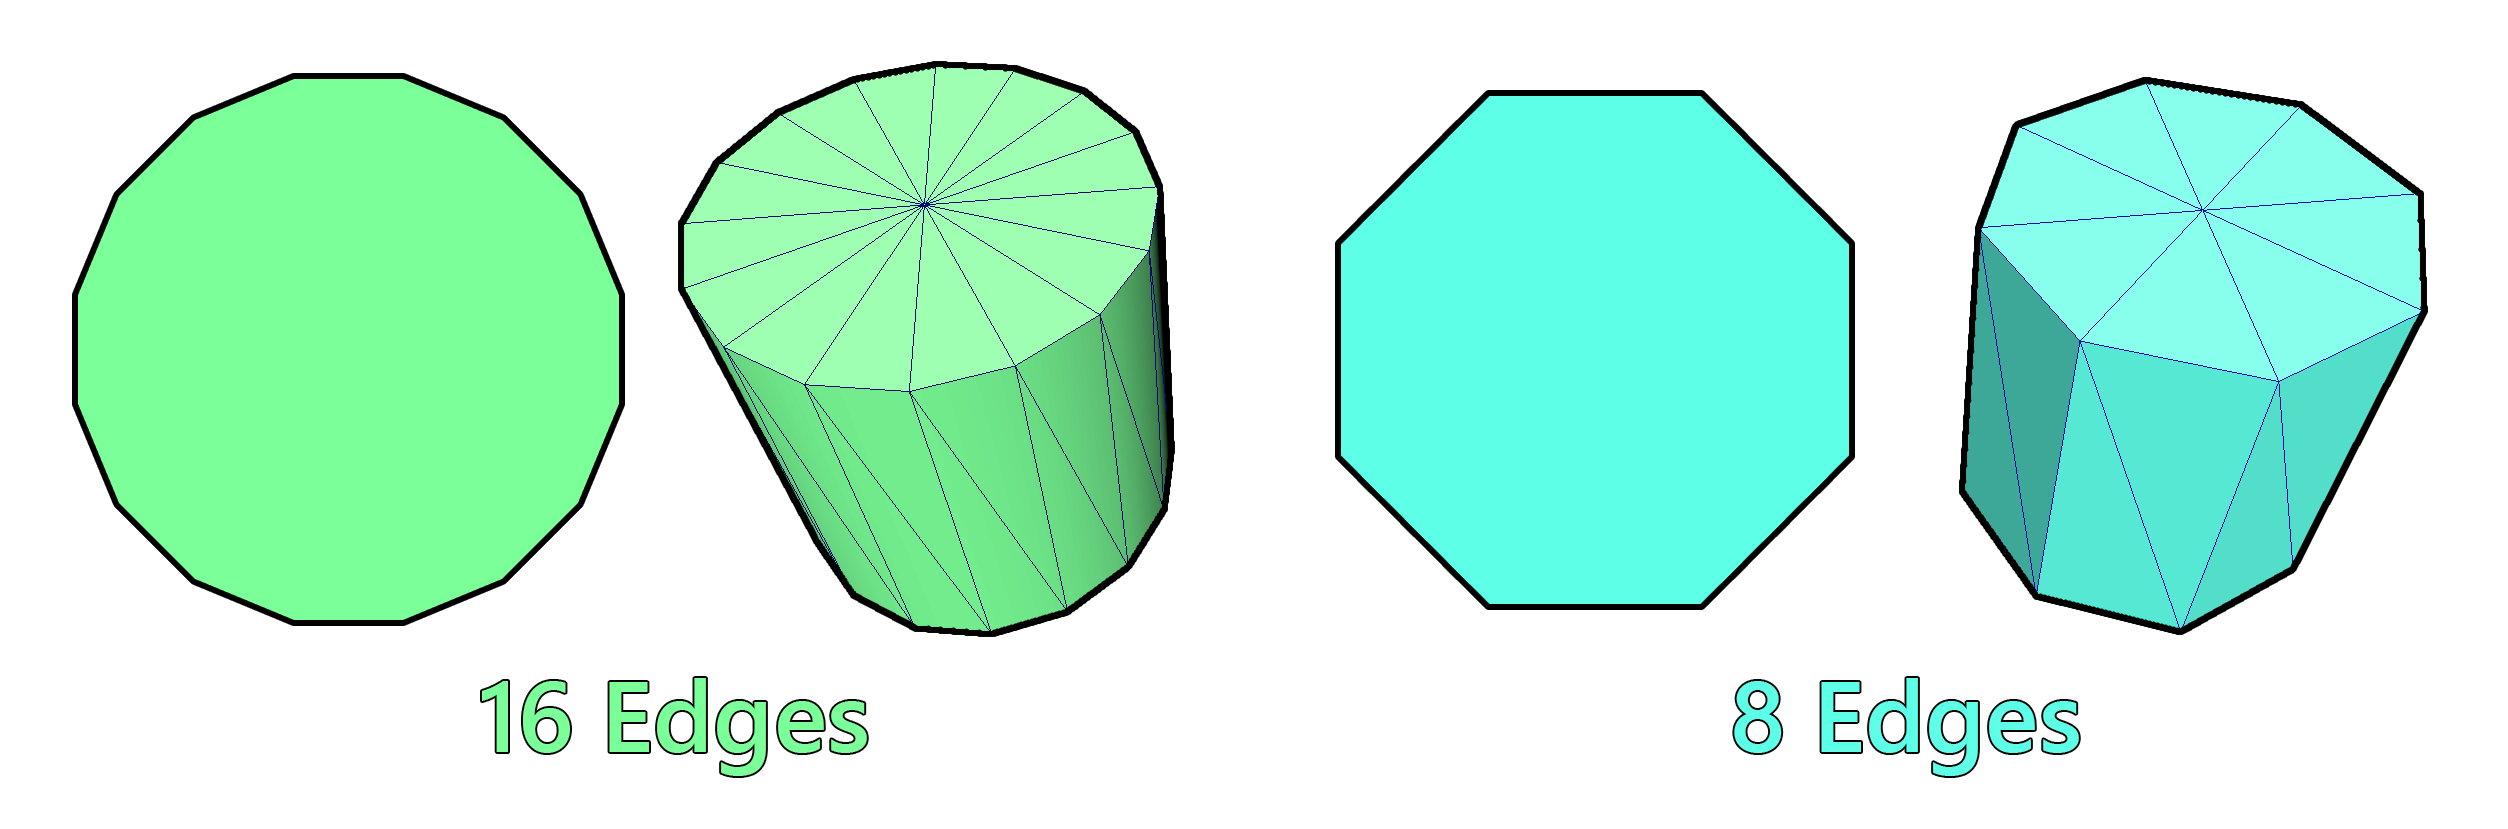
When simplified to 8 edges, it still resembles a circle and cylinder, but only requires half the information.
As an added bonus, the further away a model is from the viewer, the less we need to worry about detail. This change in visual fidelity is what must be balanced when showing models on the HoloLens. The models should look as realistic and compelling as possible while still allowing the HoloLens to run efficiently.
Techniques: Reduction / Decimation / Remeshing / Manual
There are 4 main avenues for taking a highly detailed model and reducing the amount of faces it has, to allow for its use in an application. There are many programs that use each of these types of simplification. I will point out the strengths and weaknesses of each type by using the main programs in my workflow to perform these techniques:
-
1
Automatic Reduction: Maya / Max / Simplygon / PiXYZ
Earlier forms of reduction relied on well-constructed 3D models that simply needed to have fewer tris while maintaining good mesh construction.
The signs of good mesh construction (before and after reduction) are:
- A strong silhouette: recognizable at a glance and has a distinctive shape.
- Well defined volume: similar to silhouette but in 3 dimensions.
- Clean edge loops: orderly edges that enclose this volume (think rows and columns.)
- Good animation deformation: A model of a person, for example, would have knees that bend and look correct when they are walking.
Most of these reduction tools were/are not very good at preserving both volume and silhouette at the same time. This is especially noticeable in older programs that don't rearrange the vertices and triangles to accomplish their goals, they simply remove detail in the "smartest ways possible". Being the least complicated form of mesh simplification gives it fewer main options: percentage of tris reduced, target number of tris, or target number of vertices.
Reduction works best for medium - low detail objects that have already been worked on by an artist and need to have their detail reduced further to improve performance on devices like the HoloLens.
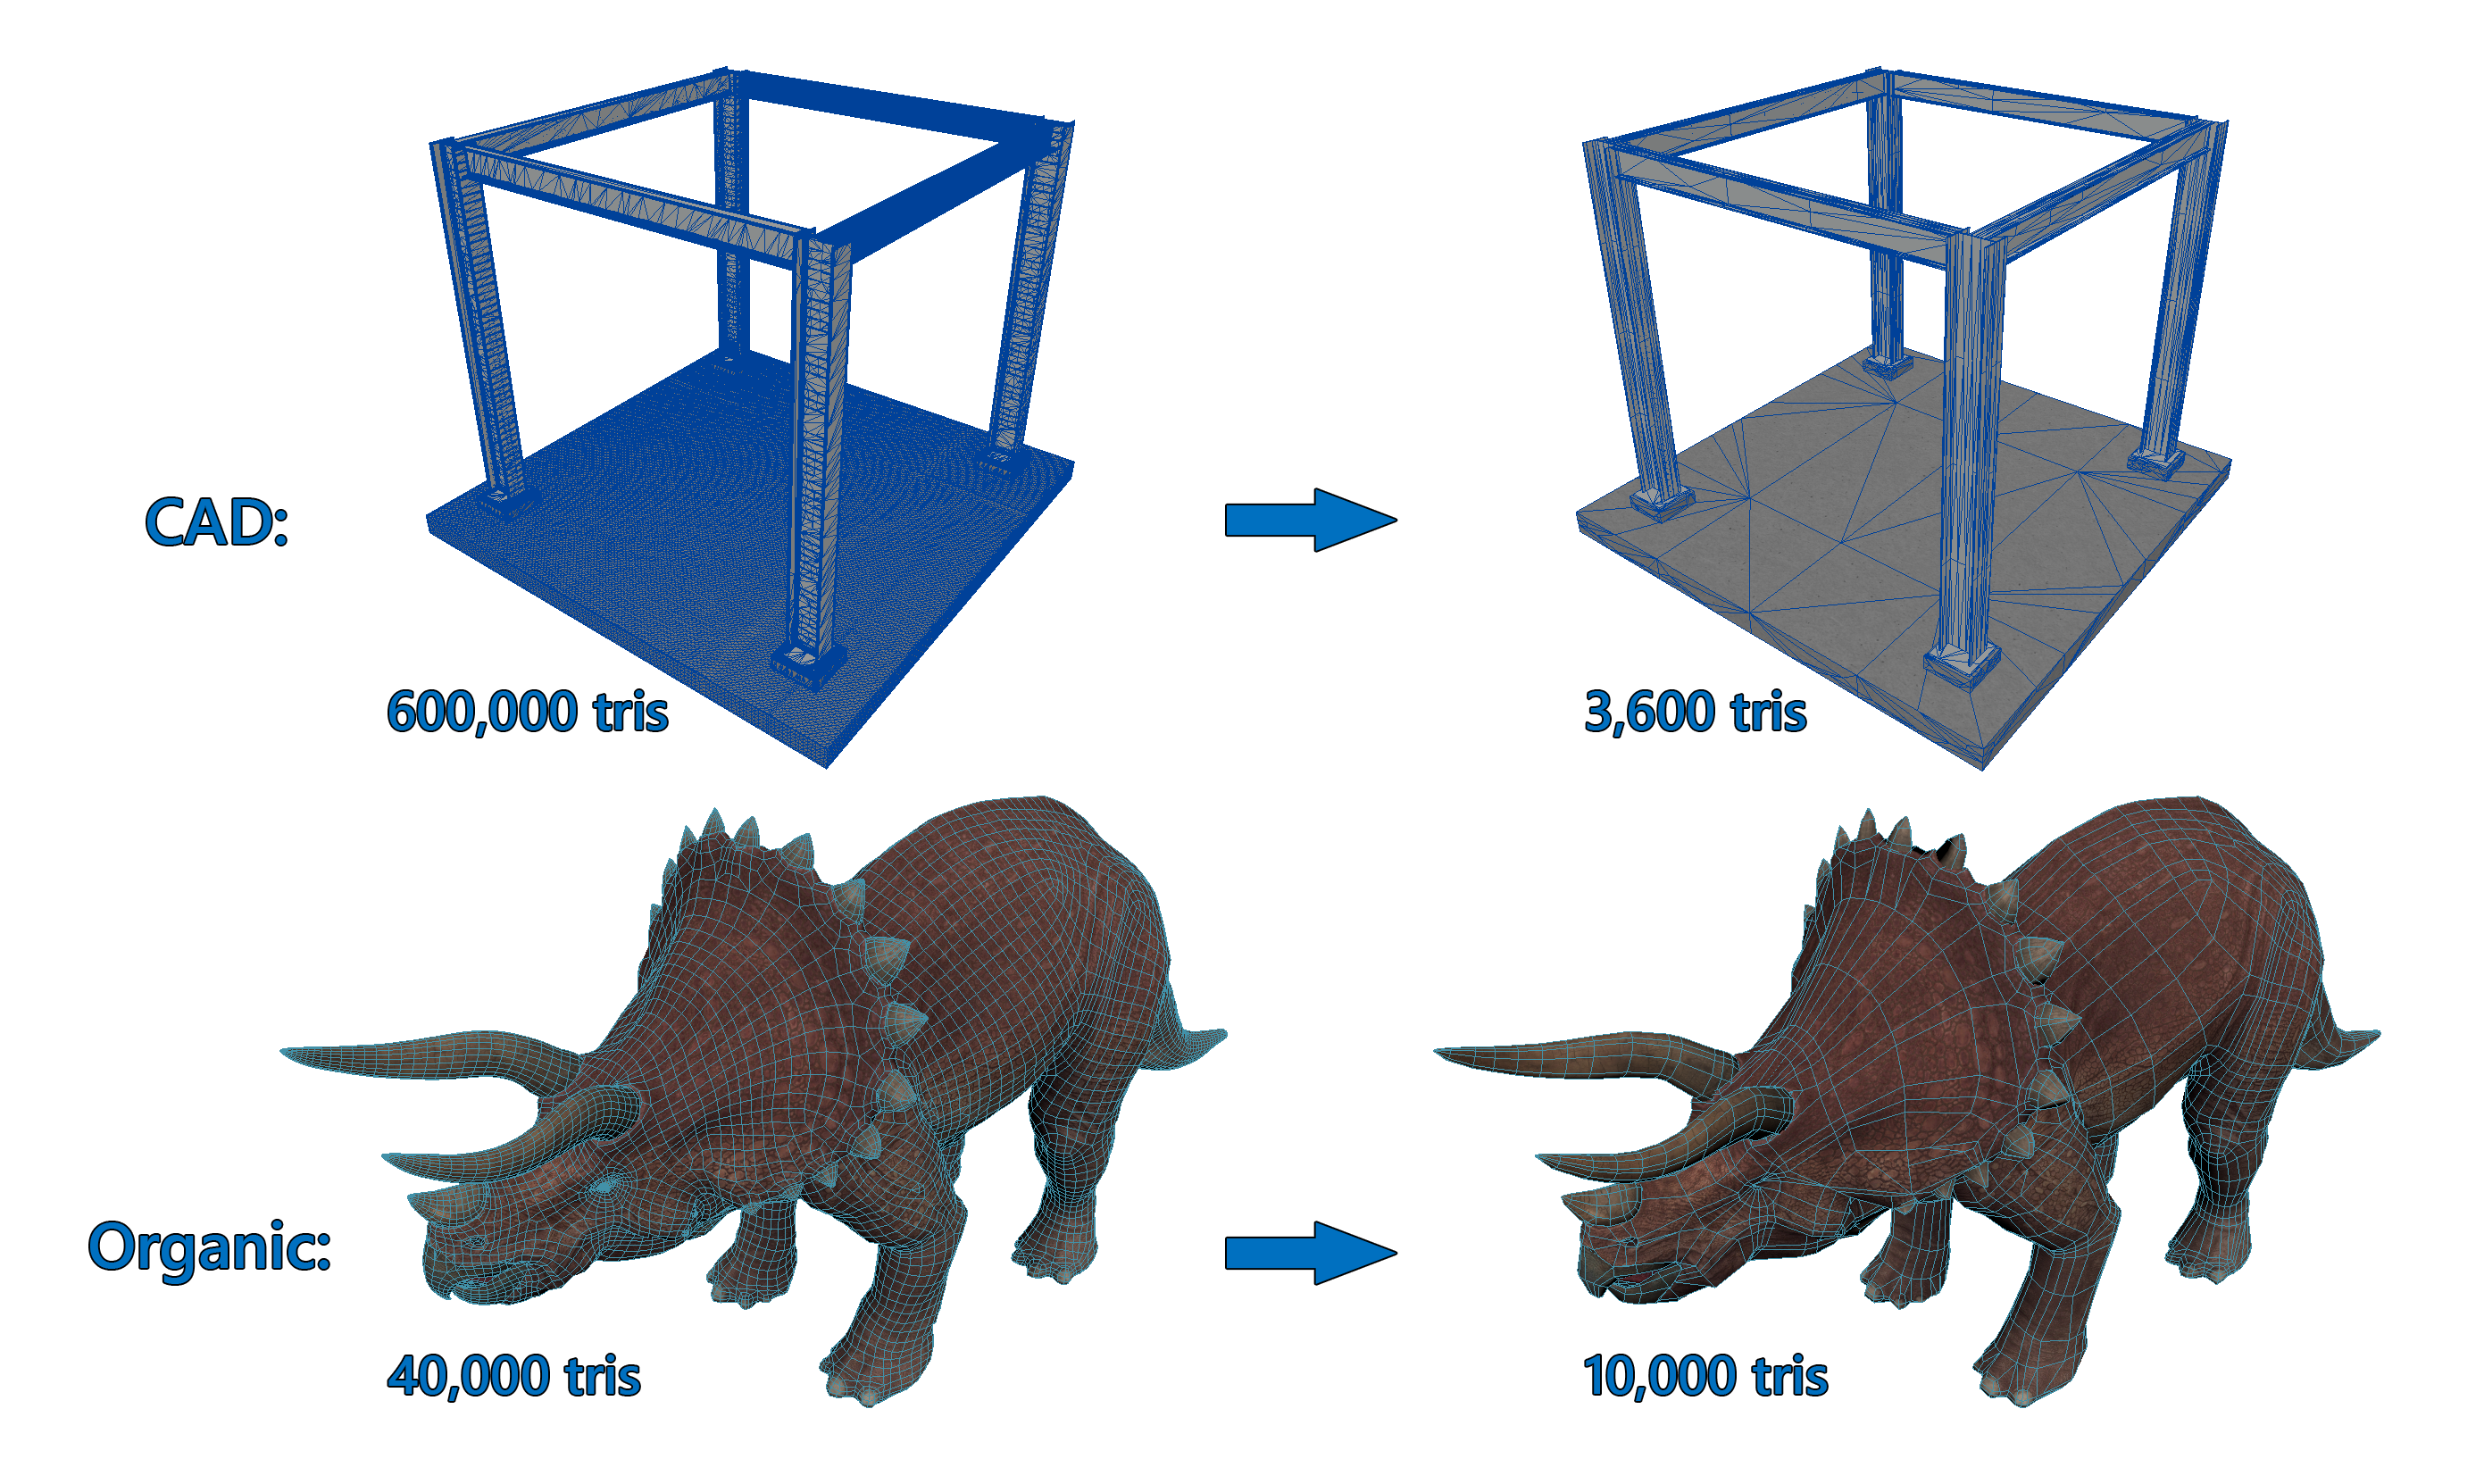
Reduction is a good starter step for almost any mesh. Both the CAD and organic meshes need a little re-work to finish them but they have been simplified while remaining easy to work on by artists. The difference between the high detailed CAD (figure A) and the Organic model (figure B) shows pre-arranged geometry has the best chance of creating a good mesh after reduction.
-
2
Automatic Decimation: ZBrush / 3D Coat / PTC Creo
Decimation is very different from reduction because it destroys the mesh to create an approximation with the least amount of tris possible. This approach can work VERY well on extremely high density models at the end of their workflow (i.e. never need be edited by artists again) and don't need to deform. This mesh will look great from a distance and usually keeps a very nice silhouette at the expense of "good" edge loops and clean construction.
Decimation destroys the ability to work further on a mesh so it is best used at the end of the modeling process and for objects that don't need to animate or deform. Decimated meshes are quick to create but hard to edit.
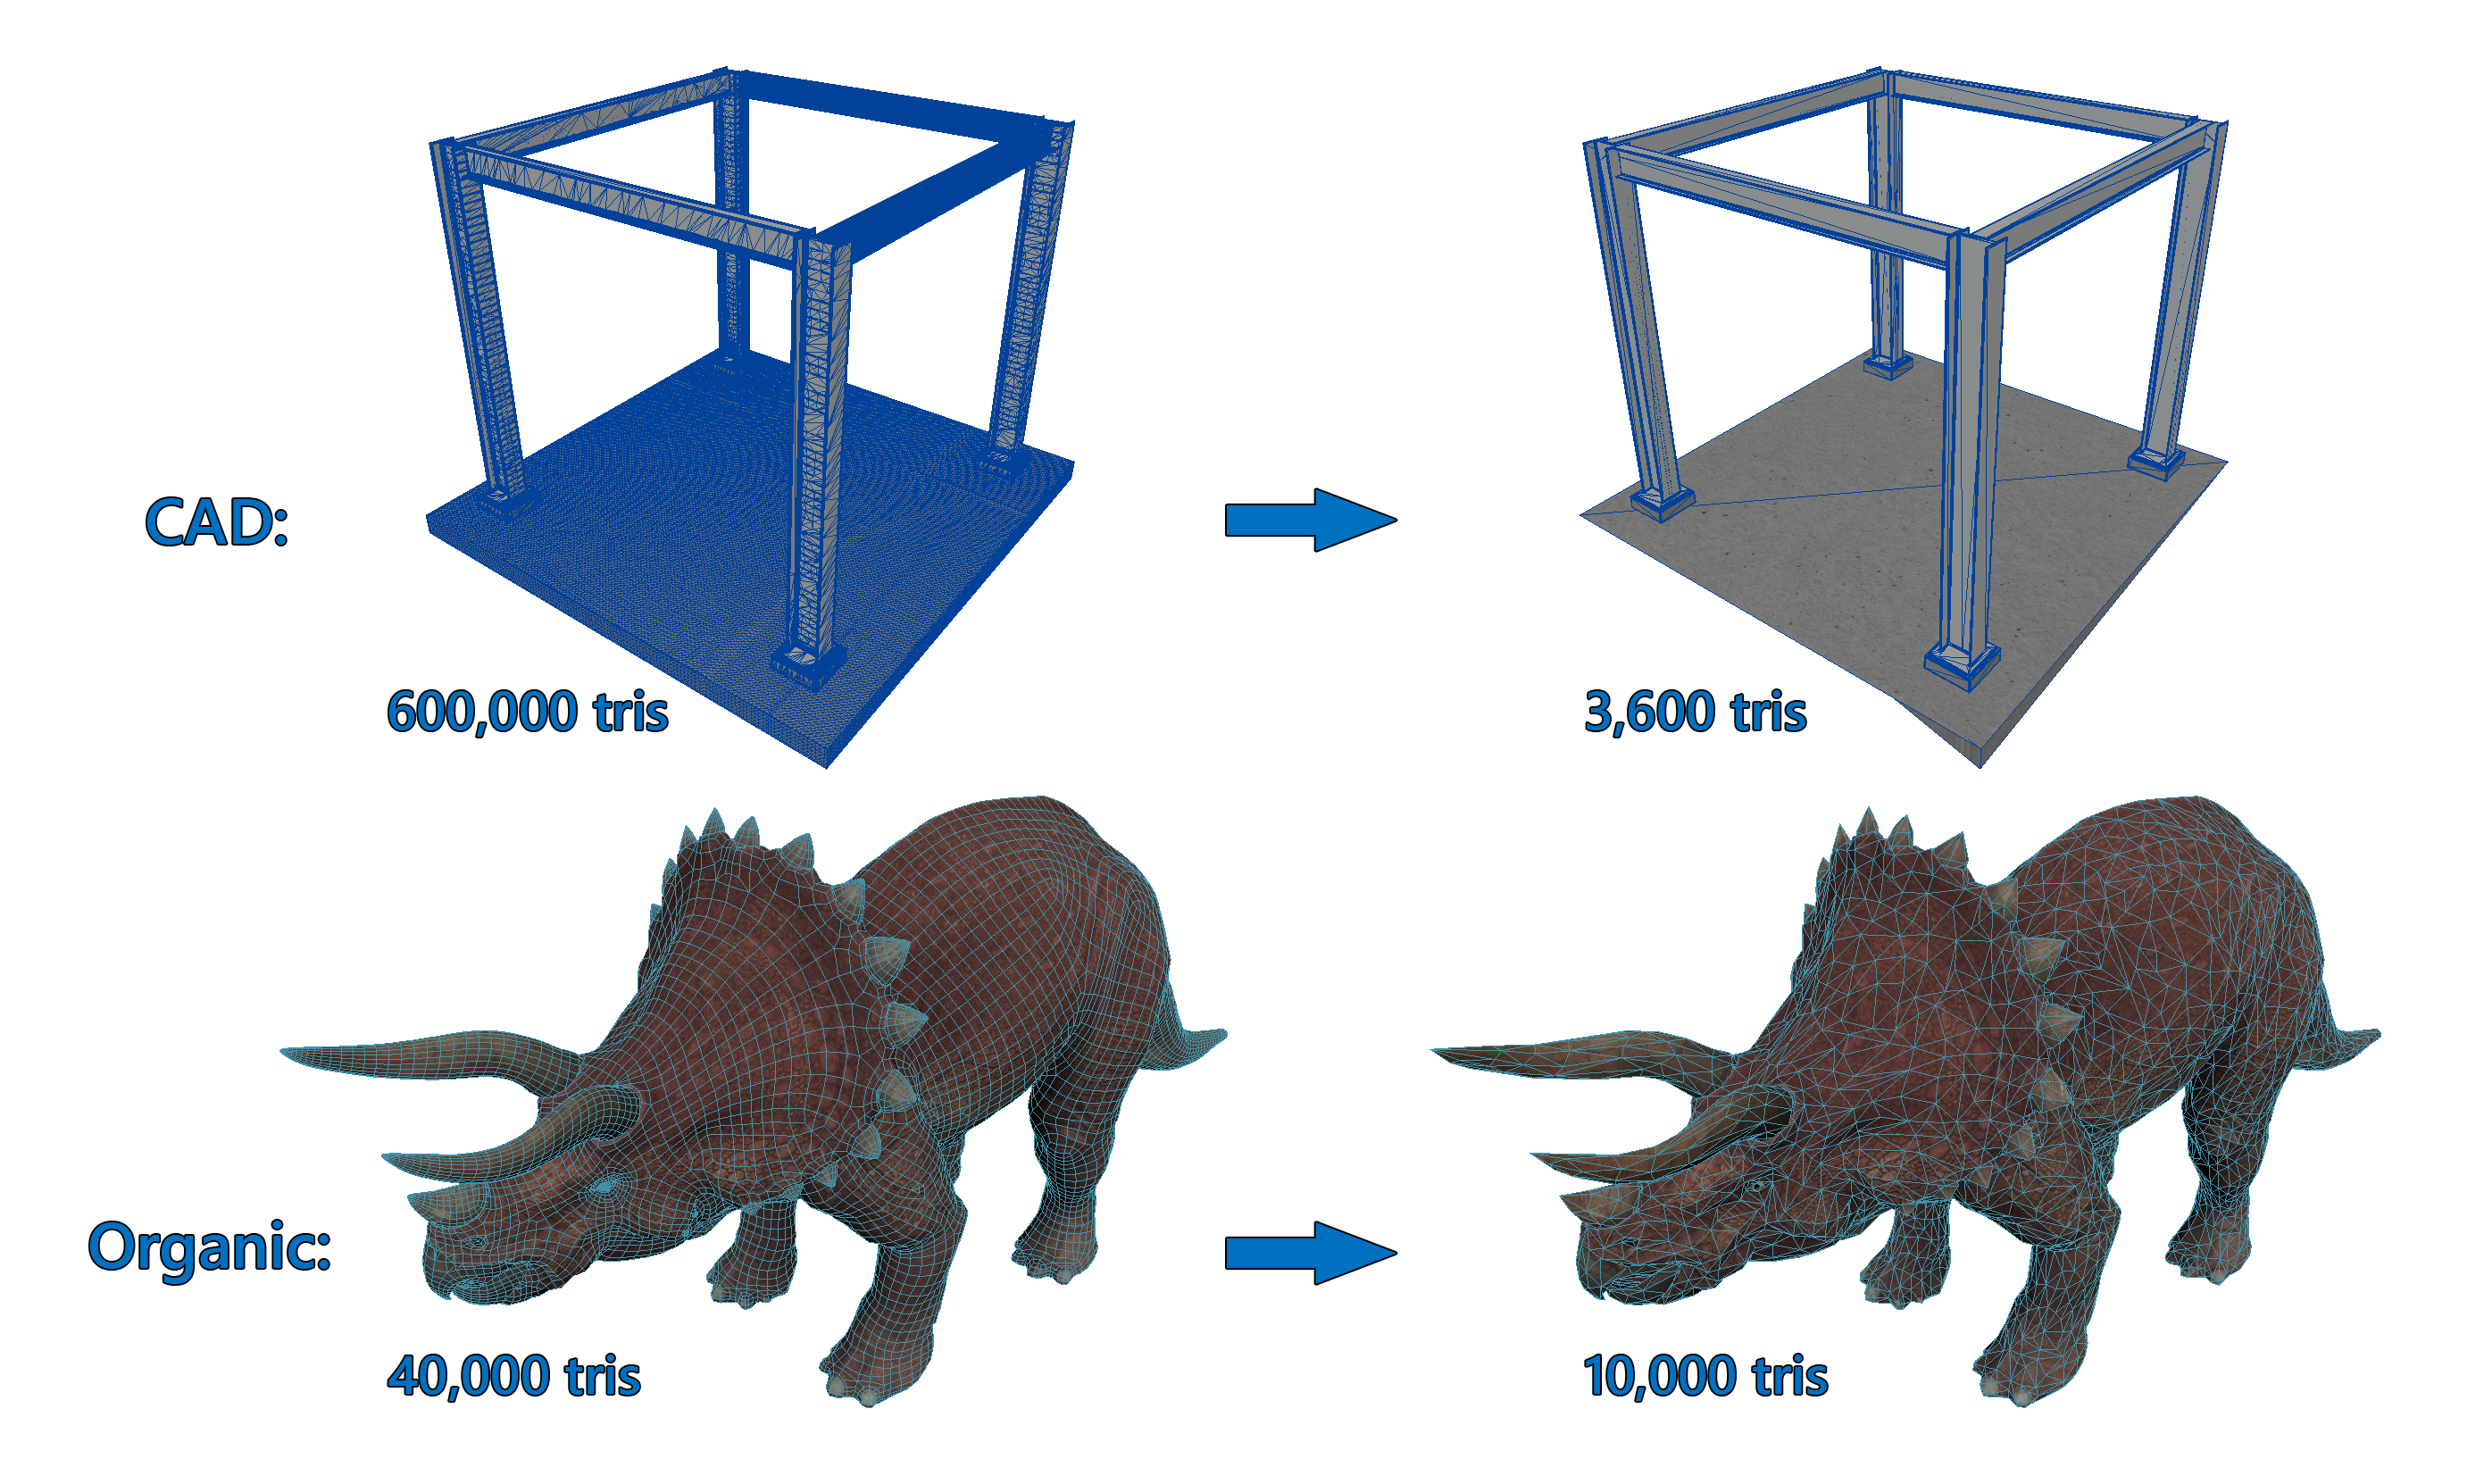
Decimation worked well on the beams but not the floor for the CAD mesh. The organic mesh is only 1/4th the tris but lost its edge loops and the mesh is haphazard and confusing.
-
3
Automatic Remeshing: Simplygon / ZBrush / PiXYZ / 3D Coat
The newest addition to automatic mesh simplification is remeshing. Programs that use remeshing are basically "shrink wrapping" new tris on top of the detailed mesh. The geometry is completely new and doesn't maintain any of the attributes of the older mesh. This can be very useful if there wasn't a well-constructed mesh to begin with; or harmful if there was. Thankfully, a lot of the programs allow you to "guide" remeshing visually to mitigate potential work loss.
Remeshing is most useful on more organic or smooth machined objects (trees or cars) that have a lot of large, smooth, surfaces. It rearranges the vertices to get a best match for silhouette and volume of the starting mesh while reducing its detail the needed amount.
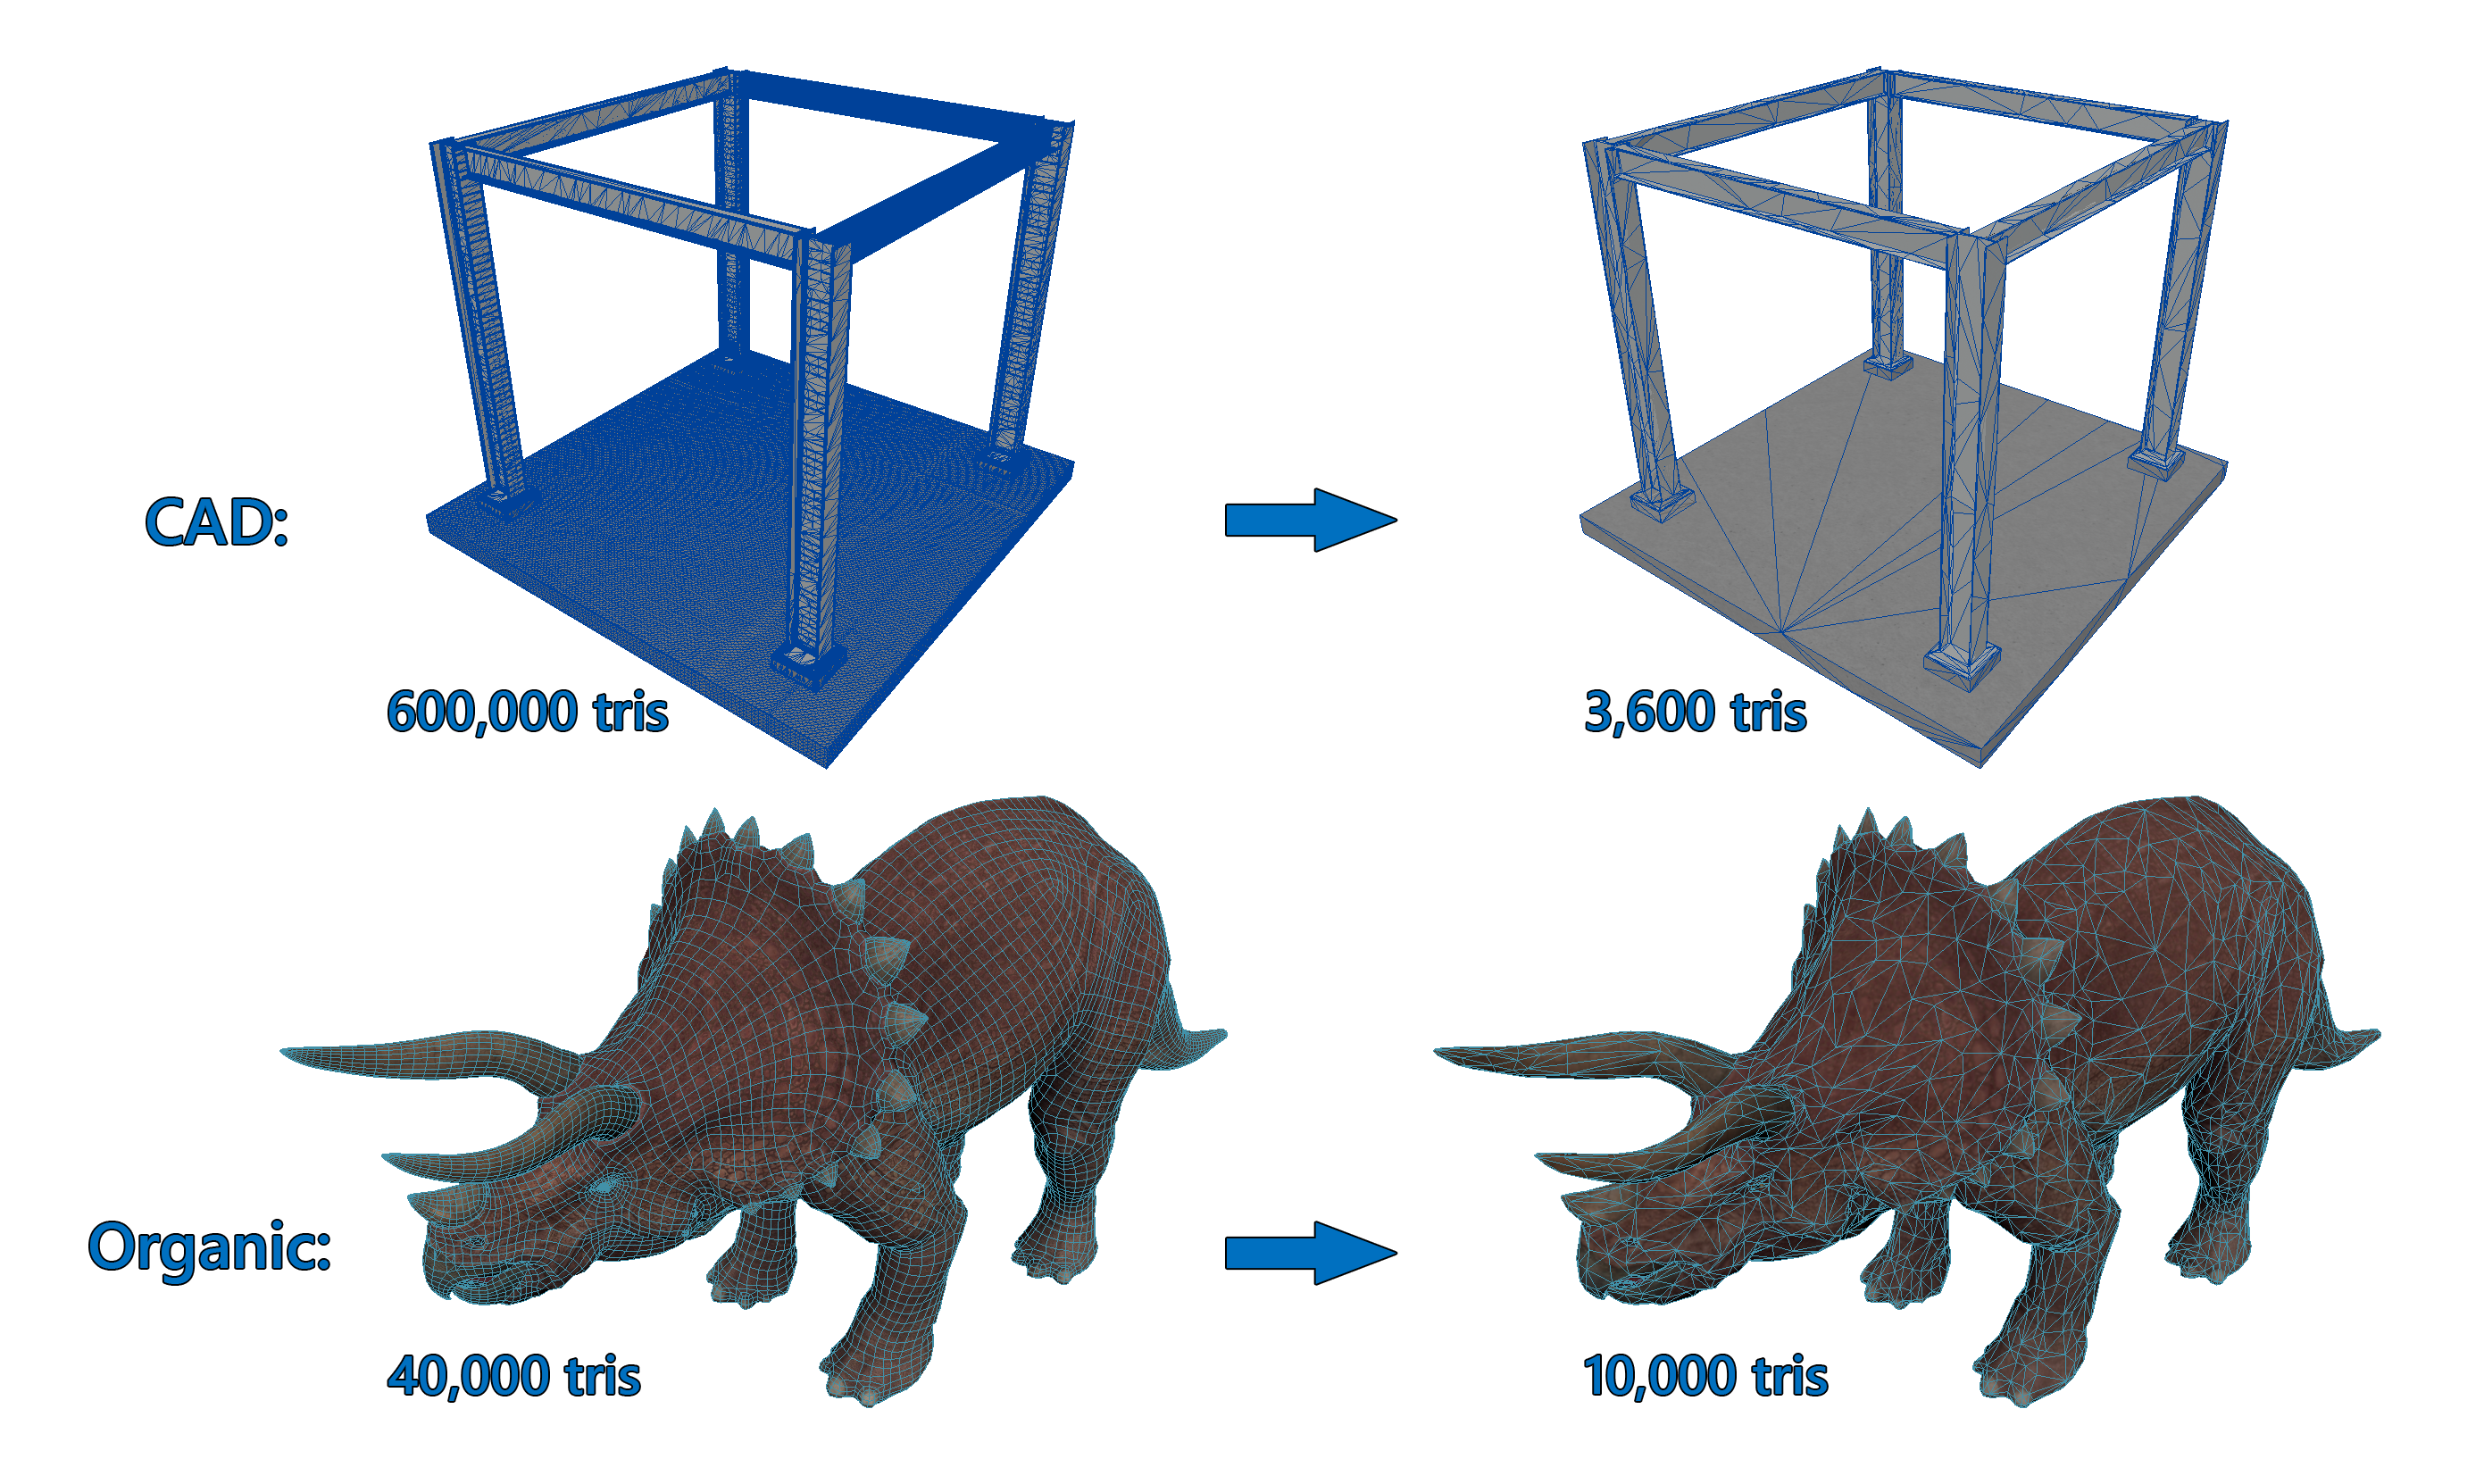
Remeshing worked a little less well on the CAD model than decimation did. The organic model looks similar but remeshing has the added bonus of being able to automatically transfer textures and collapse multiple meshes into one mesh.
-
4
Manual: Maya / Max / TopoGun / ZBrush / 3D Coat
Manually editing meshes has a lot of pros:
- The ability to keep the model easily editable by other artist through proper modeling practices.
- Being able to choose exactly where to keep and remove detail to make the model as polished as possible.
- Combining all 3 other automatic processes to save time and get to a good starting point, and then putting finishing touches on the model manually.
The one major con of using a fully manual process is time. If we had all of the time in the world to complete each project, being able reduce, decimate, and remesh, exactly the way I'd like would always be my choice.
Thankfully using it in conjunction with one or all of the automatic methods will produce a great combination of a fast and well-constructed mesh.
Workflow:
Thankfully, there are a lot of programs that allow us to pick and choose which type of simplification we use. The typical workflow for a given project looks like this.

We take a file from a client and open it in a CAD program like PiXYZ or PTC Creo to start the initial remeshing / decimation / reduction. Then, we run it through another program like Meshlab to get a 3D mesh for an artist to refine, and then make final polish passes in Maya.
What are the best processes and why Valorem?:
We use what works best to fit our client's needs. With the help of an envisioning session and direct communication, we are able to figure out what process are best to use for our individual client's needs.
In the end, the most polished product comes from a careful combination of these processes. If the client has a highly detailed model, we can use remeshing, decimation, and/or manual processes to get an accurate and polished, HoloLens ready model. If the client already has a lower detail model, we could use reduction, remeshing, and/or manual to also get a HoloLens ready model.
Knowing what goes into these processes is complex but, thankfully, executing on them is our job. Tell us what you need and we'll take it from there!
Originally published by the Valorem Immersive Experiences Design Team. See more writing.